Organizing Your OpenAPI Docs in .
As software developers, we spend a large part of our job thinking about crafting perfect, organized, easy-to-maintain code. But do we give the same attention to our API documentation? In this article, we go over some strategies for better organizing our OpenAPI documentation in .NET with Swashbuckle and explain why it's important to do so.
Quick OpenAPI Refresher
If you’ve worked with REST API’s in any capacity, you’ve probably encountered some OpenAPI documents (previously known as Swagger). In case you’re not familiar with the OpenAPI specs, it is a specification for designing, documenting, and consuming RESTful APIs. You can find more about the OpenAPI specs at https://www.openapis.org/
OpenAPI gives us a standard, language-agnostic interface for describing API endpoints, their input parameters, expected output, and possible errors. As developers we’re probably most familiar with it being used to document our APIs, however it can also be used:
- For generating API clients based on the spec
- To define and plan new API features
- For QA by using OpenAPI specifications to generate test cases, validate API responses, and ensure the API implementation conforms to the defined specification
Using OpenAPI in .NET
If you’ve created a new API project in .NET, you’ve probably noticed the AddSwaggerGen, UseSwagger and UseSwaggerUI methods in your Startup. or Program.. These methods together configure our project to start generating OpenAPI documents and docs. Simply run your project and Visual Studio should open your OpenAPI document.
The example above uses Swashbuckle, a good alternative to Swashbuckle could be NSwag. While Swashbuckle focuses on documentation, NSwag promotes itself as a comprehensive toolchain that also supports generating clients for C# and TypeScript (JavaScript).
Why Organizing OpenAPI Documents Matters
Before we dive into the code let’s discuss why we should even bother organizing our OpenAPI documents.
Swashbuckle does a good job of keeping your docs organized when you start developing your API. Routes are grouped per Controller (WebAPI) or per file (Minimal APIs). For small or internal API’s this might be enough.
However, as your API evolves and more teams or individuals begin using it, you may want to create more separation between different routes, beyond just using files or controllers. It doesn’t make much sense to show the routes that are only meant for authenticated employees to users outside your company. Or showing all versions of a route in the same document even when some are deprecated.
Creating separate documents for different uses or teams enables easier use of APIs. I personally found it useful when phasing out legacy code, we had to support API routes that were still in use. To encourage teams to transition to the new routes we were actively rewriting, we split our documents between the new and old routes. This allowed us to share the appropriate documents with each team, providing old route documentation to teams that still used them while directing new teams to the new routes by default.
Grouping OpenAPI documents with GroupName
Adding multiple documents to Swashbuckle is as easy as telling it what the new document should be called and where users can find it:
1services.AddSwaggerGen(c =>2{3c.SwaggerDoc("v1", new OpenApiInfo { Title = "Shiny API V1", Version = "v1" });4c.SwaggerDoc("v2", new OpenApiInfo { Title = "Shiny API V2", Version = "v2" });5})
The first argument has to be a URI-friendly name since the documents will be made available at /
By default, Swashbuckle uses the ApiDescription. to decide which action to include in a document. This means that each action with a GroupName of “v2” will be included in the v2 document.
For Controllers we can set the GroupName by using the ApiExplorerSettings Attribute:
1[Route("example")]2[ApiExplorerSettings(GroupName = "controllerGroupName")]3public class ExampleController : Controller4{5[HttpGet("")]6[ApiExplorerSettings(GroupName = "actionSpecificGroupName")]7public IActionResult Action() { }8}
With Minimal APIs we can use the WithGroupName extension method to achieve the same:
1app.MapGet("example",()=>{ /**/ }).WithGroupName("actionSpecificGroupName");
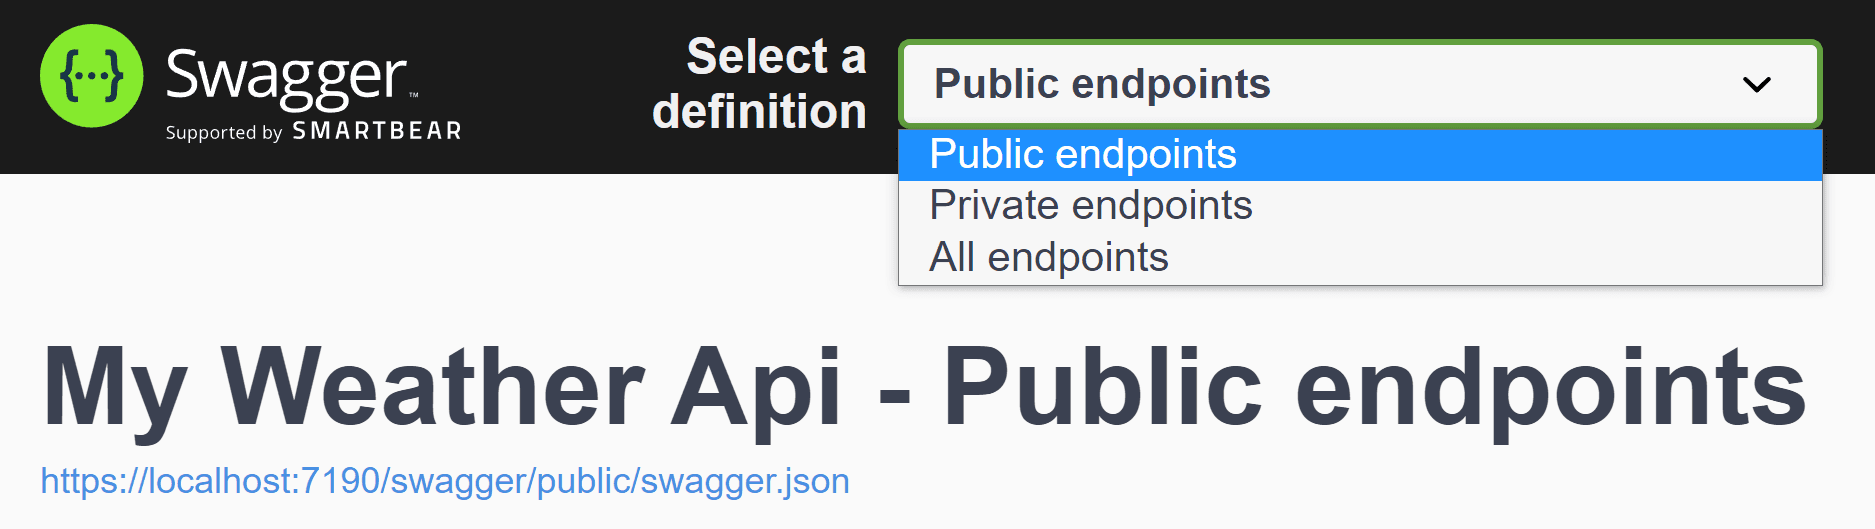
SwaggerUI for multiple documents
While we can now find each JSON document at / we don’t have any human friendly version. If you would navigate to the interactive docs at / you’ll get an error telling you that no documents could be found.
We still have to tell the SwaggerUI where to look by adding:
1app.UseSwaggerUI(c =>2{3c.SwaggerEndpoint("v1/swagger.json", "My old V1 API");4c.SwaggerEndpoint("v2/swagger.json", "My shiny new V2 API");5});
Advanced Swashbuckle Grouping: Implementing Custom Logic
The default behavior of grouping by groupname will be enough in a lot of cases. However, for more complex APIs it might make more sense to implement your own grouping logic. Swashbuckle makes this easy by allowing us to configure a predicate with custom grouping logic.
For example, if we want to extend our documentation with an “All” page we could extend the default behavior like this:
1config.DocInclusionPredicate((docName, description) =>2{3return docName == "All"4|| apiDescription.GroupName == null5|| apiDescription.GroupName == documentName;6}
Leveraging Custom Metadata in API Documentation Organization
If you’re looking to add some more advanced custom logic you could add custom metadata to your actions and use those in your DocInclusionPredicate.
If you’re using the well-known Controllers you can do this by making your own custom attribute.
For example:
1public class CustomMetadataAttribute : Attribute2{3public string DocRegex = string.Empty;45public CustomMetadataAttribute(string DocumentRegex)6{7DocRegex = DocumentRegex;8}9}
If you want to know all the ins and outs of custom attributes check out my other blogpost: A 10 minute introduction to C# Attributes.
We can access our custom attribute like this:
1config.DocInclusionPredicate((docName, description) =>2{3var customAttribute= description.ActionDescriptor4.EndpointMetadata5.OfType<CustomMetadataAttribute>()6.FirstOrDefault();7if (customAttribute == null) return false;89//...10});
Minimal APIs
If you’re using Minimal APIs you can achieve the same without using custom attributes. The WithMetadata extension method on IEndpointConventionBuilder lets us slap whatever class we want as Metadata on our actions.
The only other thing you’ll have to change is what type you’re filtering on in the DocInclusionPredicate
Organizing OpenAPI Docs Takeaways
As you’ve seen by now, grouping your api docs in Swashbuckle isn't really that much effort. I've personally found it very useful to spend more time creating organized API documentation.
The flexibility of Swashbuckle's DocInclusionPredicate configuration allows me to implement custom logic for more complex API organization strategies. Add custom metadata to that mix and I can really tailor my API documentation organization to my specific needs.
I hope you enjoyed this article and found it useful.
You might also enjoy reading my take on Minimal APIs vs Controller based APIs: Should you use WebApi or Minimal APIs?
What to read next:
I really hope you enjoyed this article. If you did, you might want to check out some of these articles I've written on similar topics.
- Read Generate OpenAPI documentation for dynamic query parameters in .NET 7— 8 min read readGenerate OpenAPI documentation for dynamic query parameters in .NET 7
- Read Gracefully handling exceptions in ASP.NET Core Minimal APIs
 — 10 min read readGracefully handling exceptions in ASP.NET Core Minimal APIs
 - Read Three ways to structure .NET Minimal APIs— 10 min read readThree ways to structure .NET Minimal APIs

